Before replacing Tile Flooring Denver, prioritize safety with protective gear and proper ventilation. Gather essential tools including a utility knife, tile spacers, floor scraper, and cleaning supplies. Remove old tiles carefully, inspect for damage to the subfloor. Prepare the subfloor by cleaning and repairing gaps. Install underlayment for durability and comfort. Lay new tiles according to manufacturer guidelines, seal with grout, and consider colored grout for an elevated look. Consult professionals for Laminate Flooring Installation Denver, Terrazzo tile Denver, or Denver vinyl flooring installation services.
Looking to refresh your Denver tile flooring? This comprehensive guide walks you through removing and replacing your old tiles step-by-step. From preparing for tile removal with safety in mind, to selecting the right tools, and from meticulously removing old tiles to laying new ones with a sealed finish, we cover it all. Elevate your home’s style with a professional-quality tile flooring upgrade in Denver.
- Prepare for Tile Removal: Safety First
- Tools Needed for Tile Replacement
- Remove Old Tile: Step-by-Step Process
- Prepare Subfloor for New Tiles
- Install Underlayment: A Crucial Step
- Lay and Seal New Tiles: Final Touches
Prepare for Tile Removal: Safety First

Before tackling the removal and replacement of your Tile Flooring Denver, it’s crucial to prioritize safety. This project involves heavy tools and materials, so protective gear is non-negotiable. Grab a pair of thick work gloves, safety goggles, ear protection, and a dust mask to shield yourself from debris, sharp edges, and harmful chemicals. Ensure your workspace is well-ventilated to prevent inhaling toxic fumes from any adhesives or sealants you’ll be removing. A clear, organized area will also make the process smoother, so clear away any furniture or obstacles that might get in your way.
Remember, safety is paramount when it comes to handling slate tile specialists Denver or Wall Tiles Denver. If you’re unsure about any part of the removal process, consider consulting a professional who offers Laminate Flooring Installation Denver services. They can provide guidance and ensure the job is done correctly, minimizing potential hazards.
Tools Needed for Tile Replacement

When it comes to replacing tile flooring in Denver, the right tools are essential for a successful and efficient job. For a typical tile replacement project, you’ll need a few specialized tools to ensure the process goes smoothly. First, invest in a good quality utility knife or saw designed for cutting tiles. This tool allows you to precisely cut and shape tiles to fit your space. Additionally, a tile spacers set will help maintain consistent gaps between tiles, ensuring a neat finish.
Don’t forget about protective gear, such as safety goggles and gloves, which are crucial for keeping yourself safe from sharp edges and debris. For removing old adhesive or tough stains, you might require a floor scraper or a powerful steam cleaner. Moreover, a bucket, cleaning solutions, and rags will facilitate the cleaning process during and after tile replacement. Thinking about a fresh look? Consider adding some creative flair with new flooring options like terrazzo tile Denver or even exploring laminate flooring Denver for a distinct style.
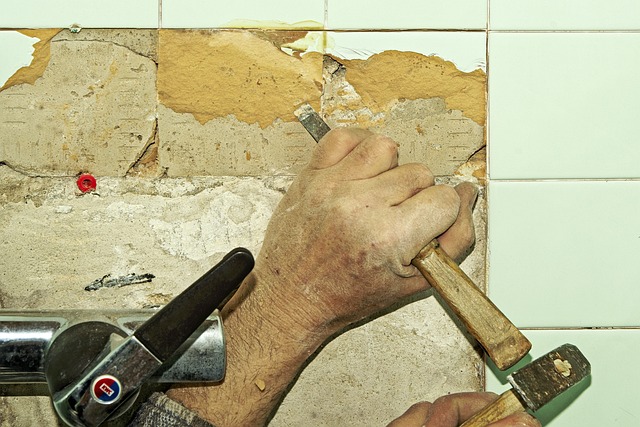
Remove Old Tile: Step-by-Step Process

Removing old tile flooring in Denver is a crucial step before installing a new tiled backsplash or resilient tile flooring. The process involves several careful steps to ensure efficient removal without damaging the subfloor. Start by gathering the necessary tools, including a hammer, chisel, utility knife, and protective gear. Next, inspect the room for any nails or screws embedded in the tiles, which can be removed with a nail puller.
With the room prepared, begin by cutting along the grout lines using the utility knife to loosen the tile from the adhesive. Once the tiles start to lift, use the hammer and chisel to carefully pry them up. Be patient and work methodically to avoid damaging the subfloor. After removing all the old tiles, sweep and clean the area thoroughly before proceeding with the next step or considering an epoxy tile coating Denver professionals recommend for a durable finish.
Prepare Subfloor for New Tiles

Before laying down your new tile floor in Denver, preparing the subfloor is a crucial step that ensures long-lasting and stable results. Start by thoroughly cleaning the existing surface to remove any dirt, debris, or old adhesive. This can be done using a vacuum and a mild cleaning solution suitable for tiles. If there are any gaps or holes in the subfloor, repair them with appropriate materials, such as wood putty or composite patches, ensuring the surface is even and smooth.
Once the subfloor is ready, it’s time to consider modern tile trends Denver has to offer. You might opt for a contemporary look with large-format tiles or go for a more intricate pattern using various textures and colors. With Denver tile flooring services at your disposal, you can transform your space into a stylish and durable masterpiece. But remember, the key is to choose tiles that match your subfloor’s stability and moisture resistance to avoid any future issues, ensuring your new hardwood flooring Denver residents desire remains intact for years to come.
Install Underlayment: A Crucial Step

When replacing your Tile Flooring Denver, one often overlooked but crucial step is the installation of underlayment. This layer acts as a protective barrier between the new tiles and the existing surface, providing added stability and insulation. An effective underlayment not only enhances the longevity of your tile floor but also contributes to the overall comfort of your space by minimizing noise transmission and regulating temperature fluctuations.
Choosing the right underlayment for your Denver flooring project is essential. For residential settings, foam or rubber underlayments are popular choices due to their cushioning properties and ease of installation. In contrast, commercial projects might require more robust options designed to handle heavier foot traffic. Whether you opt for a traditional fiberglass mesh or a modern synthetic material, ensure it aligns with your flooring contractor Denver’s recommendations for the best results in your specific case.
Lay and Seal New Tiles: Final Touches

After carefully removing the old tiles and preparing the subfloor, it’s time to lay down new ones. Start by setting your new tiles according to the manufacturer’s guidelines, ensuring proper spacing for a seamless finish. Use a level to check the tiles’ alignment and adjust as needed. Once the tiles are in place, fill the gaps with suitable grout, creating a durable seal that enhances the overall aesthetic of your Tile Flooring Denver project.
For the final touches, seal the new tiles with a high-quality sealant to protect them from stains and moisture. This step is crucial, especially for areas prone to water exposure like bathrooms or kitchens. With proper sealing, your Denver tile flooring will not only look stunning but also last longer. You can even consider adding a pop of color or a unique design with the grout to elevate the overall appeal—a service often provided by Denver vinyl flooring installation experts and bathroom tile remodeling specialists.
Upgrading your tile flooring in Denver is a rewarding project that can transform your space. By following this step-by-step guide, from preparing for removal to the final installation, you’ll have a new, durable, and aesthetically pleasing floor. Remember, safety and proper preparation are key to achieving excellent results with minimal hassle. With the right tools and techniques, replacing tile flooring in Denver is a manageable DIY task that can enhance your home’s value and beauty.